
The year is 2021 and I've decided to embark on a journey to update an old laptop running an installation of Gentoo Linux that hasn't been updated since 2015. I've since used macOS and I've recently settled on a Windows 11 desktop running WSL2 as my main development environment. There's a lot of CPU power on this desktop sitting idle a lot of the time so I decided to share it with the old Gentoo laptop and have things running a little faster by giving distcc a go. In this article, I'll lay out the steps required to have it work. YMMV.
Distcc
Distcc is a program designed to distribute compiling tasks across a network to participating hosts. It comprises a server, distccd, and a client program, distcc. Distcc can work transparently with ccache, Portage, and Automake with a small amount of setup.
-- https://wiki.gentoo.org/wiki/Distcc
Please note that one of the requirements for using distcc is that all of the computers on the network need to have the same GCC version.
Installing Gentoo on WSL
WSL 2 is a new version of the Windows Subsystem for Linux, a compatibility layer for running ELF64 Linux binaries natively on Windows 10, Windows 11, and Windows Server 2019. WSL 2 was announced in 2019, introducing changes such as a real Linux kernel, through a subset of Hyper-V features. This articles assumes that WSL 2 is already up and running on your Windows OS.
As mentioned in the preamble, I'm running WSL2 on a Windows 11 desktop. So, first things first, let's get Gentoo Linux installed in WSL. To install it I roughly followed the Gentoo in WSL guide.
A stage 3 tarball is required so grab one from your favourite Gentoo source mirror or the Gentoo downloads website. I've gone for an openrc build (instead of systemd). You will then need to extract it to a tar file. Note that at the time of writing the Gentoo in WSL guide shows a code example importing a *.tar.xz file but that is incorrect. You want a *.tar file instead.
I'll perform the next steps in a Windows PowerShell.
PS C:\Users\vitor\Downloads\Gentoo> ls

Mode      LastWriteTime       Length        Name
----      -------------       ------        ----
-a----    29/11/2021 22:15    1009377280    stage3-amd64-openrc-20211128T170532Z.tar
After extracting the downloaded stage3 file import it into WSL using the command shown below. I've selected D:\wsl\Gentoo as the installation directory.
wsl.exe --import Gentoo D:\wsl\Gentoo\ .\stage3-amd64-openrc-20211128T170532Z.tar.xz --version 2
This will create a ext4.vhdx file in your desired location.
PS D:\wsl\Gentoo\> ls

Mode      LastWriteTime       Length        Name
----      -------------       ------        ----
-a----    07/12/2021 16:24    14460911616   ext4.vhdx
Using the Gentoo distribution
You can now run your newly imported Gentoo Linux distribution:
PS C:\Users\vitor> wsl -d Gentoo
vitor-windows /mnt/c/Users/vitor #
Next we will configure Portage by setting some initial settings in /etc/portage/make.conf. I'm using settings as recommended in this excellent article about setting up Gentoo in WSL. Note that we can't use -march=native or -mtune=native in the CFLAGS or CXXFLAGS variables of make.conf when compiling with distcc so I've set the CPU architecture explicitly (znver3).
vitor-windows ~ # cat /etc/portage/make.conf
COMMON_FLAGS="-O2 -pipe"
CFLAGS="${COMMON_FLAGS} -march=znver3"
CXXFLAGS="${CFLAGS}"
FCFLAGS="${COMMON_FLAGS}"
FFLAGS="${COMMON_FLAGS}"

# NOTE: This stage was built with the bindist Use flag enabled
PORTDIR="/var/db/repos/gentoo"
DISTDIR="/var/cache/distfiles"
PKGDIR="/var/cache/binpkgs"

# This sets the language of build output to English.
# Please keep this setting intact when reporting bugs.
LC_MESSAGES=C

USE="-X -gtk -nls"

# No hardware videocard support
VIDEO_CARDS="dummy"

ACCEPT_LICENSE=""

# Disable non-functional sandboxing features
FEATURES="-ipc-sandbox -pid-sandbox -mount-sandbox -network-sandbox"

# Define targets for QEMU
QEMU_SOFTMMU_TARGETS="aarch64 arm i386 riscv32 riscv64 x86_64"
QEMU_USER_TARGETS="aarch64 arm i386 riscv32 riscv64 x86_64"
Next we need to sync the portage tree:
vitor-windows ~ # emerge --sync
We are now ready to look at how to install and setup distcc.
Install and setup distcc
Install distcc with emerge:
vitor-windows ~ # emerge --ask sys-devel/distcc
Next, we need to configure Portage to use distcc. We will need to do this on both the WSL and the laptop (native) Gentoo installations. I'll configure the MAKEOPTS and FEATURES variables in make.conf using the strategy presented in the Gentoo Distcc guide.
set the value of N to twice the number of total (local + remote) CPU cores + 1, and
set the value of M to the number of local CPU cores
We will also configure /etc/conf.d/distcc in the laptop to allow both distcc clients to communicate with each other. It's important to note that both machines are in a local network in a 192.168.0.0/24 subnet.
WSL configuration
The WSL host has an AMD Ryzen 9 5900X processor with 12 cores and 24 thread processors as displayed in the /proc/cpuinfo output.
vitor-windows ~ # uname -a
Linux vitor-windows 5.10.60.1-microsoft-standard-WSL2 #1 SMP Wed Aug 25 23:20:18 UTC 2021 x86_64 AMD Ryzen 9 5900X 12-Core Processor AuthenticAMD GNU/Linux

vitor-windows ~ # cat /proc/cpuinfo | grep processor | wc -l
24
Therefore:
vitor-windows ~ # cat /etc/portage/make.conf
...
MAKEOPTS="-j57 -l24"
FEATURES="${FEATURES} distcc"
Running either openrc or systemd in WSL2 is currently "problematic" so we will launch distccd explicitly on the command-line and won't need to configure /etc/conf.d/distcc here.
Laptop (ultrabook) configuration
The old laptop is far less powerful than their new WSL companion:
vitor-ultrabook ~ # uname -a
Linux vitor-ultrabook 5.10.76-gentoo-r1 #1 SMP PREEMPT Sun Dec 5 15:27:52 WET 2021 x86_64 Intel(R) Core(TM) i5-3317U CPU @ 1.70GHz GenuineIntel GNU/Linux

vitor-ultrabook ~ # cat /proc/cpuinfo | grep processor | wc -l
4
Portage configuration:
vitor-ultrabook ~ # cat /etc/portage/make.conf
...
MAKEOPTS="-j57 -l4"
FEATURES="${FEATURES} distcc"
Distcc configuration (launched by openrc):
vitor-ultrabook ~ # cat /etc/conf.d/distccd
# /etc/conf.d/distccd: config file for /etc/init.d/distccd

DISTCCD_EXEC="/usr/bin/distccd"

DISTCCD_OPTS="${DISTCCD_OPTS} --port 3632"

# Logging
DISTCCD_OPTS="${DISTCCD_OPTS} --log-level debug --log-file /var/log/distcc/distccd.log"

# --allow is now mandatory as of distcc-2.18.
DISTCCD_OPTS="${DISTCCD_OPTS} --allow 192.168.0.0/24"
Windows and WSL networking
The last configuration piece is to expose the WSL internal IP address via port-forwarding so it's reachable by the latpop .
Here we see that the Windows host has a 192.168.0.32 assigned to it whereas the WSL2 adapter has a 172.24.80.1 IP address.
Windows IP Configuration


Wireless LAN adapter Wi-Fi:

   Connection-specific DNS Suffix  . :
   Link-local IPv6 Address . . . . . : fe80::a4c3:9fc2:486:7a2a%8
   IPv4 Address. . . . . . . . . . . : 192.168.0.32
   Subnet Mask . . . . . . . . . . . : 255.255.255.0
   Default Gateway . . . . . . . . . : 192.168.0.1

Ethernet adapter vEthernet (WSL):

   Connection-specific DNS Suffix  . :
   Link-local IPv6 Address . . . . . : fe80::e029:d3cf:4809:b22e%30
   IPv4 Address. . . . . . . . . . . : 172.24.80.1
   Subnet Mask . . . . . . . . . . . : 255.255.240.0
   Default Gateway . . . . . . . . . :
And the IP address assigned to the Gentoo instance is 172.24.83.194:
vitor-windows ~ # ifconfig
eth0: flags=4163<UP,BROADCAST,RUNNING,MULTICAST>  mtu 1500
        inet 172.24.83.194  netmask 255.255.240.0  broadcast 172.24.95.255
        inet6 fe80::215:5dff:fe4c:3e71  prefixlen 64  scopeid 0x20<link>
        ether 00:15:5d:4c:3e:71  txqueuelen 1000  (Ethernet)
        RX packets 1433177  bytes 1781034319 (1.6 GiB)
        RX errors 0  dropped 0  overruns 0  frame 0
        TX packets 388279  bytes 35333250 (33.6 MiB)
        TX errors 0  dropped 0 overruns 0  carrier 0  collisions 0
In a PowerShell session with Administrator privileges setup port-forwarding with the netsh command:
PS C:\Users\vitor> netsh interface portproxy add v4tov4 listenport=3632 listenaddress=0.0.0.0 connectport=3632 con
nectaddress=172.24.83.194
Once distcc has been started in WSL you can test the connection with Test-NetConnection
PS C:\Users\vitor> Test-NetConnection 172.24.83.194 -Port 3632


ComputerName     : 172.24.83.194
RemoteAddress    : 172.24.83.194
RemotePort       : 3632
InterfaceAlias   : vEthernet (WSL)
SourceAddress    : 172.24.80.1
TcpTestSucceeded : True
You will also need to open and exception in your firewall to allow connections to the 3632 TCP port used by distccd. If using the native Windows Defender Firewall you can run a couple of New-NetFirewallRule commands to allow traffic to and from that port:
PS C:\Users\vitor> New-NetFirewallRule -DisplayName "Gentoo Distccd" -Direction Inbound -LocalPort 3632 -Action Allow -Protocol TCP


Name                          : {a5e66c0a-79c6-42d6-a6e6-29808b4b11b3}
DisplayName                   : Gentoo Distccd
Description                   :
DisplayGroup                  :
Group                         :
Enabled                       : True
Profile                       : Any
Platform                      : {}
Direction                     : Inbound
Action                        : Allow
EdgeTraversalPolicy           : Block
LooseSourceMapping            : False
LocalOnlyMapping              : False
Owner                         :
PrimaryStatus                 : OK
Status                        : The rule was parsed successfully from the store. (65536)
EnforcementStatus             : NotApplicable
PolicyStoreSource             : PersistentStore
PolicyStoreSourceType         : Local
RemoteDynamicKeywordAddresses : {}

PS C:\Users\vitor> New-NetFirewallRule -DisplayName "Gentoo Distccd" -Direction Outbound -LocalPort 3632 -Action Allow -Protocol TCP


Name                          : {4be6aa6a-ae65-44e0-b66a-5427dfaf32ea}
DisplayName                   : Gentoo Distccd
Description                   :
DisplayGroup                  :
Group                         :
Enabled                       : True
Profile                       : Any
Platform                      : {}
Direction                     : Outbound
Action                        : Allow
EdgeTraversalPolicy           : Block
LooseSourceMapping            : False
LocalOnlyMapping              : False
Owner                         :
PrimaryStatus                 : OK
Status                        : The rule was parsed successfully from the store. (65536)
EnforcementStatus             : NotApplicable
PolicyStoreSource             : PersistentStore
PolicyStoreSourceType         : Local
RemoteDynamicKeywordAddresses : {}
Distributed compiling with distccd
We are finally ready to launch distccd on both machines and reap the benefits of all the setup work done so far.
Launch distcc in WSL
As previously mentioned we can't rely on openrc in WSL to launch distccd so we will launch it from the command-line as follows:
vitor-windows ~ # distccd --port 3632 --log-level debug --allow 192.168.0.0/16 --allow 172.24.0.0/16 --daemon --no-detach --user distcc
distccd[194] (dcc_discard_root) successfully set no_new_privs
distccd[194] (dcc_discard_root) discarded root privileges, changed to uid=240 gid=240
Launch distcc in the laptop
In the laptop, using openrc, launching distccd is as simple as:
vitor-ultrabook ~ # rc-service distccd start
Check that the WSL client is reachable using netcat:
vitor-ultrabook ~ # nc -zv 192.168.0.32 3632
192.168.0.32: inverse host lookup failed:
(UNKNOWN) [192.168.0.32] 3632 (distcc) open
Start emerge'ing
Everything is now in place to emerge packages in the laptop, using distccd to distribute code compilation with the Windows machine running WSL.
Just for the sake of showing what's happening under the hood I'll enable extra
distcc debugging by setting the DISTCC_VERBOSE environment variable in /etc/portage/bashrc:
vitor-ultrabook ~ # cat /etc/portage/bashrc
export DISTCC_VERBOSE=1
Now when installing a package via Portage one can see pieces of source and compiled code being transferred between the distcc clients. This should hopefully result in much faster builds than if it was solely built on a single machine unless you have a very slow network.
>>> Emerging (1 of 1) net-analyzer/nmap-7.92::gentoo
 * nmap-7.92.tar.bz2 BLAKE2B SHA512 size ;-) ...


>>> Compiling source in /var/tmp/portage/net-analyzer/nmap-7.92/work/nmap-7.92 ...
make -j57 -l4 -C . makefile.dep
make: Entering directory '/var/tmp/portage/net-analyzer/nmap-7.92/work/nmap-7.92'
distcc[33] (dcc_trace_version) distcc 3.4 x86_64-pc-linux-gnu; built Nov 30 2021 09:08:35
distcc[33] (dcc_recursion_safeguard) safeguard level=0
...

distcc[442] (dcc_r_file) received 24560 bytes to file payload.o
distcc[442] (dcc_r_file_timed) 24560 bytes received in 0.006844s, rate 3504kB/s
distcc[442] 1136553 bytes from payload.cc compiled on 192.168.0.32 in 0.9942s, rate 1116kB/s
distcc[442] (dcc_unlock) release lock fd3
distcc[442] compile payload.cc on 192.168.0.32 completed ok
distcc[442] elapsed compilation time 0.995464s
distcc[442] (dcc_exit) exit: code 0; self: 0.000000 user 0.006772 sys; children: 0.094792 user 0.026804 sys
distcc[442] (dcc_cleanup_tempfiles_inner) deleted 2 temporary files
...

distcc[84] compile (null) on localhost completed ok
distcc[84] (dcc_unlock) release lock fd3
distcc[84] elapsed compilation time 0.250713s
distcc[84] (dcc_exit) exit: code 0; self: 0.002075 user 0.000000 sys; children: 0.184401 user 0.065695 sys
distcc[84] (dcc_cleanup_tempfiles_inner) deleted 0 temporary files
...

NMAP SUCCESSFULLY INSTALLED
>>> Completed installing net-analyzer/nmap-7.92 into /var/tmp/portage/net-analyzer/nmap-7.92/image
...
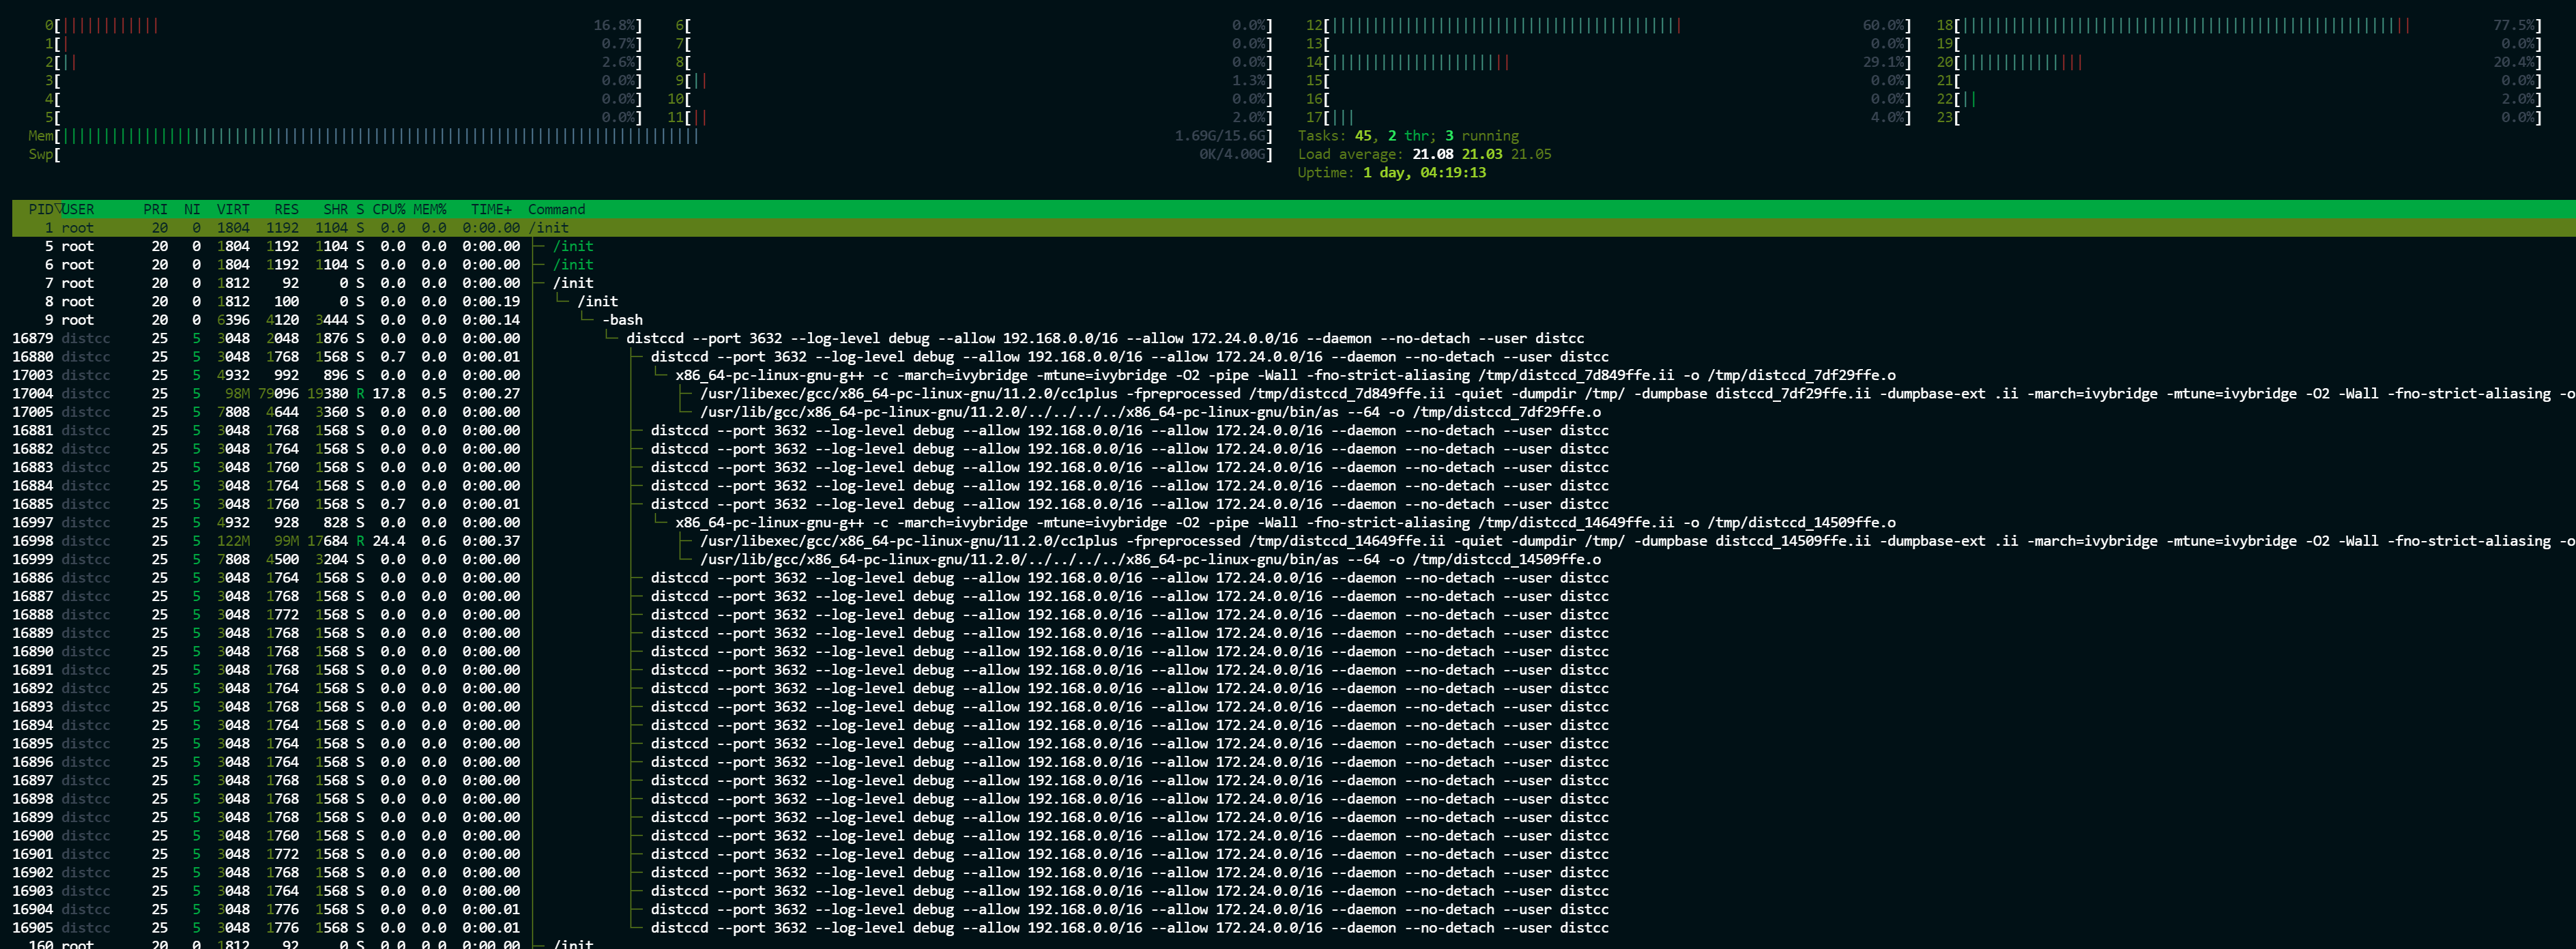
You can also verify that distcc is doing its thing in the WSL host by keeping an eye on htop while the package is being installed in the other machine. Pretty neat!
And that's all for today. Thanks for reading and good luck!
Credits: Header photo by Claudio Schwarz on Unsplash